Forex Megadroid (Highly Rated!) FOREX Trading Tool

Forex Megadroid (Highly Rated!)

Forex Megadroid brings the experience of Forex experts to your fingertips through a proven system that can skyrocket your Forex earnings. …

Forex Trading Tool: Forex Megadroid
Format: Autotrader for MetaTrader4 Platform
Price: $97.00
Warranty Information: 60 Day Money Back Guarantee
Created By: Albert Perrie and John Grace
Customer Support: Full Email Support
Product Review: Forex Megadroid Review
Official Site: Forex Megadroid
Continue Reading

Create zoom effect for images in blogspot

This is the demo, click on the image to see :

Click Image For Demo

1st , log in Blogger > Layout > Edit HTML then add this code below before
</head> tag:

<script src='http://shibin.110mb.com/FancyZoom.js' type='text/javascript'/>
<script src='http://shibin.110mb.com/FancyZoomHTML.js' type='text/javascript'/>


Ok now next step, you have to change the <body> by <body onload="setupZoom()"> instead

Save! You have already created zoom effect for images. However ,to zoom image you have from now , you don't have to use the tag <img src="Image link" /> to add image anymore , but you have to use this new form :

<a href="Image link"><img src="image link" width="300" border="0" height="200" />


Note:
Image link : support jpg, png, gif ...
Width : thumbnail width.
Height: thumbnail height.
Border: thumbnail border.


For example :
<a href="http://img193.imageshack.us/img193/6925/flowersandswirls.jpg"><img src="http://imgcash2.imageshack.us/img193/6925/flowersandswirls.th.jpg" width="300" height="200" border="0" /></a>
Continue Reading

Align Adsense Widget on Blogger

1. Go to Blogger Dashboard.

2. Go to Layouts and click on Edit Html subtab of Template tab.

3. Backup your template to PC.

4. Then put a check in Expand Widgets Template box at top of Edit Template text box and scroll down to or Ctrl+F <b:widget id='AdSense to this line :

Then add align='center'. Like this…

<b:widget id='AdSense1' locked='false' title='' type='AdSense'>
<b:includable id='main'>
<div class='widget-content'>
<data:adCode/>
</div>
</b:includable>
</b:widget>


Code AFTER changes:

<b:widget id='AdSense1' locked='false' title='' type='AdSense'>
<b:includable id='main'>
<div align='center' class='widget-content'>
<data:adCode/>
</div>
</b:includable>
</b:widget>

optional

align='center'

align='left'

align='right'
Continue Reading

How to Integrate "Digg this" button to Blogger Blog

In this tutorial I will show you "how to integrate "digg this" button to your blogger blog and how to wrap "digg this" button around and inline beside Blogger post content. This will be good part of your blog design.

I think you know Digg, Why you need to install Digg button to your blog? This is the quote from the Digg:

The Digg This button is for website and blog publishers that want to encourage their audience to submit or digg their content on Digg. Join thousands of sites that have already added Digg This and seen their content exposed to the Digg community.

We've given our latest Digg This button a brain - it's smart enough to:

* Encourage users to submit new content from your site to Digg. We'll detect if the content exists already and provide either a Submit or Digging interface
* Display the real-time Digg count for content already on Digg
* Support News, Video, or Podcast content.
* Be backward compatible with the last version of our Digg This button

So, you can get some (or , maybe, big) traffic from Digg.

This is how it will look like:

Digg This Button


It is hard to install this button to your blog and make it wrap around and inline beside post content, so, I will tell you how to do it:

1. Go to Blogger Dashboard.

2. Go to Layouts and click on Edit Html subtab of Template tab.

3. Backup your template to PC.

4. Then put a check in Expand Widgets Template box at top of Edit Template text box and scroll down to the blog posts widget body to this line :

<p><data:post.body/></p> or <data:post.body/>
Append the following lines of code into the template BEFORE the line of
<data:post.body/>


located above:
<div id='digg'><script type='text/javascript'>
digg_url = '<data:post.url/>';
digg_title = '<data:post.title/>';
digg_window = 'new';
</script>
<script src='http://digg.com/tools/diggthis.js' type='text/javascript'/></div>

6.Now you need to create CSS style for Digg this button. Find this line:
]]></b:skin>

If you want to have digg button on the left side of post, append the following lines of code into the template BEFORE the line of
]]></b:skin>
located above:
#digg {
float: left;
margin-right: 5px;
}

If you want to have digg button on the right side of post, append the following lines of code into the template BEFORE the line of
]]></b:skin> located above:

#digg {
float: right;
margin-left: 5px;
}

Save your template.
That's all =)
Continue Reading

New Moon

Continue Reading

Pad Mess

Pad Mess


Download Pad Mess Template

Live Demo
Author: Deluxe Templates
Designer: EZwpthemes
Continue Reading

Fixed Side Menu For Blogger

Fixed side menu for blogger blogspot or some says it as fixed slide in menu for blogger as was seen only in wordpress but now can be used in bloggers also.As you could see it in my blog i have side menu that moves together with you scroll movement up and down on my blog.I am sharing this with you because many of my readers were asking how to make it as they liked it much and wanted to add it to there blogs so if you liked side menu in my blog you can go further to install it in your blog too.
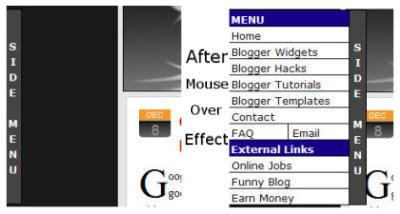


First Download these two files to your computer.
ssm.js
ssmItems.js

Now open the ssmItems.js file in notepad
After opening it in notepad you will see the codes like written below.


<!--

/*
Configure menu styles below
NOTE: To edit the link colors, go to the STYLE tags and edit the ssm2Items colors
*/
YOffset=150; // no quotes!!
XOffset=0;
staticYOffset=30; // no quotes!!
slideSpeed=20 // no quotes!!
waitTime=100; // no quotes!! this sets the time the menu stays out for after the mouse goes off it.
menuBGColor="black";
menuIsStatic="yes"; //this sets whether menu should stay static on the screen
menuWidth=150; // Must be a multiple of 10! no quotes!!
menuCols=2;
hdrFontFamily="verdana";
hdrFontSize="2";
hdrFontColor="white";
hdrBGColor="#170088";
hdrAlign="left";
hdrVAlign="center";
hdrHeight="15";
linkFontFamily="Verdana";
linkFontSize="2";
linkBGColor="white";
linkOverBGColor="#FFFF99";
linkTarget="_top";
linkAlign="Left";
barBGColor="#444444";
barFontFamily="Verdana";
barFontSize="2";
barFontColor="white";
barVAlign="center";
barWidth=20; // no quotes!!
barText="SIDE MENU"; // <IMG> tag supported. Put exact html for an image to show.

///////////////////////////

// ssmItems[...]=[name, link, target, colspan, endrow?] - leave 'link' and 'target' blank to make a header
ssmItems[0]=["MENU"] //create header
ssmItems[1]=["
Home", "http://smartbloggertemplate.blogspot.com", ""]
ssmItems[2]=["
Tips and Tricks", "http://smartbloggertemplate.blogspot.com/search/label/Tips%20and%20Tricks",""]
ssmItems[3]=["
Blogger Hacks", "http:///smartbloggertemplate.blogspot.com/search/label/Blogger%20Hack", ""]
ssmItems[4]=["
Blogger Tutorials", "http://smartbloggertemplate.blogspot.com/search/label/Blogger%20Tutorial", "_new"]
ssmItems[5]=["
Blogger Templates", "http://smartbloggertemplate.blogspot.com/search/label/Blogger%20Templates", ""]
ssmItems[6]=["
Contact", "http://smartbloggertemplate.blogspot.com/2008/11/contact-us.html", ""]

ssmItems[7]=["
FAQ", "#nogo", "", 1, "no"] //create two column row
ssmItems[8]=["
Email", "#nogo", "",1]

ssmItems[9]=["External Links", "", ""] //create header
ssmItems[10]=["
South Indian Models", "http://tollywoodceleb.blogspot.com", ""]
ssmItems[11]=["
Software Download", "http://downloadsofwarez.blogspot.com", ""]
ssmItems[12]=["
Free Softwares", "", ""]

buildMenu();

//-->


Now just edit the the links in red in codes to place your own link which you want to display and text in blue which you want to show up the title for that link.

After editing all these links just save the file.

Now upload both files ssm.js and ssmItems.js to your own server like on geocities or sigmirror dot com,don't use mine as will not work due to exceeded bandwidth.

Now GO To LAYOUT > EDIT HTML
and find the </head> tag and place the below codes before it.


<style type="text/css">
<!--
A.ssmItems:link {color:black;text-decoration:none;}
A.ssmItems:hover {color:black;text-decoration:none;}
A.ssmItems:active {color:black;text-decoration:none;}
A.ssmItems:visited {color:black;text-decoration:none;}
//-->
</style>


<SCRIPT SRC="
http://www.sigmirror.com/files/23824_orh0p/ssm.js" language="JavaScript1.2">
//Dynamic-FX slide in menu v6.5 (By maXimus, http://maximus.ravecore.com/)
//Updated July 8th, 03' for doctype bug
//For full source, and 100's more DHTML scripts, visit http://www.dynamicdrive.com
</SCRIPT>
<SCRIPT SRC="
http://www.sigmirror.com/files/23826_tfol5/ssmItems.js" language="JavaScript1.2"></SCRIPT>


And don't forget to change the links in red above with the links of yours where your ssm.js and ssmItems.js file are uploaded to your own server.

And now SAVE It.

Yup you have just Done now. View your blog. If you have any problem please write below in comments i will help you out.I think you will enjoy this widget for sure.
Continue Reading

New Blogger Tag Cloud / Label Cloud


A tag cloud or label cloud for blogger is a visual depiction of all labels used on your blog.You can see a demo of the Label cloud for blogger(blogger label cloud) here on my site. This Tag Cloud Widget was originally developed by phydeaux3. I have just simplified and made it easier to install..

First Of all Goto Your blogger Layout>Page Elements page and add a Labels Widget there..You can Do that using the Add a Page Element Option on that page.

Choose to sort the labels Alphabetically when prompted.

After Adding the Label Widget Goto Layout>Edit Html (Do not expand the widget templates for the sake of easy explanation)
You will find some code similar to

<b:widget id='Label1' locked='false' title='Labels' type='Label'/>

Now Replace that with

<b:widget id='Label1' locked='false' title='Label Cloud' type='Label'>
<b:includable id='main'>
<b:if cond='data:title'>
<h2><data:title/></h2>
</b:if>
<div class='widget-content'>
<div id='labelCloud'/>
<p align='center'>
<script type='text/javascript'>
var cloudMin = 1;
var maxFontSize = 25;
var maxColor = [35,130,196];
var minFontSize = 10;
var minColor = [35,130,195];
var lcShowCount = false;
// Don't change anything past this point -----------------
// Cloud function s() ripped from del.icio.us
function s(a,b,i,x){
if(a>b){
var m=(a-b)/Math.log(x),v=a-Math.floor(Math.log(i)*m)
}
else{
var m=(b-a)/Math.log(x),v=Math.floor(Math.log(i)*m+a)
}
return v
}
var c=[];
var labelCount = new Array();
var ts = new Object;
<b:loop values='data:labels' var='label'>
var theName = "<data:label.name/>";
ts[theName] = <data:label.count/>;
</b:loop>
for (t in ts){
if (!labelCount[ts[t]]){
labelCount[ts[t]] = new Array(ts[t])
}
}
var ta=cloudMin-1;
tz = labelCount.length - cloudMin;
lc2 = document.getElementById('labelCloud');
ul = document.createElement('ul');
ul.className = 'label-cloud';
for(var t in ts){
if(ts[t] < i="0;3"> i;i++) {
c[i]=s(minColor[i],maxColor[i],ts[t]-ta,tz)
}
var fs = s(minFontSize,maxFontSize,ts[t]-ta,tz);
li = document.createElement('li');
li.style.fontSize = fs+'px';
a = document.createElement('a');
a.title = ts[t]+' Posts in '+t;
a.style.color = 'rgb('+c[0]+','+c[1]+','+c[2]+')';
a.href = '/search/label/'+encodeURIComponent(t);
if (lcShowCount){
span = document.createElement('span');
span.innerHTML = '('+ts[t]+') ';
span.className = 'label-count';
a.appendChild(document.createTextNode(t));
li.appendChild(a);
li.appendChild(span);
}
else {
a.appendChild(document.createTextNode(t));
li.appendChild(a);
}
ul.appendChild(li);
abnk = document.createTextNode(' ');
ul.appendChild(abnk);
}
lc2.appendChild(ul);
</script>
</p>
<noscript>
<ul>
<b:loop values='data:labels' var='label'>
<li>
<b:if cond='data:blog.url == data:label.url'>
<data:label.name/>
<b:else/>
<a expr:href='data:label.url'><data:label.name/></a>
</b:if>
(<data:label.count/>)
</li>
</b:loop>
</ul>
<br/>Powered By:<small><a href='http://www.bloggerplugins.org'&t;Blogger Widgets</a></small>
<br/>Blogger Label Cloud:<small><a href='http://www.bloggerplugins.org/2008/06/label-cloud-widget-for-blogger-blogspot.html'>Label Cloud for Blogger</a></small>
</noscript>
<b:include name='quickedit'/>
</div>
</b:includable>
</b:widget>

Now find

]]></b:skin>

and replace it with


#labelCloud {text-align:center;font-family:arial,sans-serif;}
#labelCloud .label-cloud li{display:inline;background-image:none !important;padding:0 5px;margin:0;vertical-align:baseline !important;border:0 !important;}
#labelCloud ul{list-style-type:none;margin:0 auto;padding:0;}
#labelCloud a img{border:0;display:inline;margin:0 0 0 3px;padding:0}
#labelCloud a{text-decoration:none}
#labelCloud a:hover{text-decoration:underline}
#labelCloud li a{}
#labelCloud .label-cloud {}
#labelCloud .label-count {padding-left:0.2em;font-size:9px;color:#000}
#labelCloud .label-cloud li:before{content:"" !important}
]]></b:skin>


Save your template and now you should get a working Label Cloud On your Blog.


Optional Parts Proceed further only if you want to customize the cloud to a better level...

Changing Cloud Colours:

you can change those colors editing the code a little bit..
you will have to expand your widget templates and modify these 2 lines of code

var maxColor =

and

var minColor =
you have to specify the RGB values there separated by commas..If you are sure of what should be the hex codes of the maximum and minimum colors,then you can use this to convert the hex value to RGB values..If you are not sure of what the hex code of the colors are then have a look at this.

Changing the Font Sizes:
You can change the font sizes by editing these 2 lines of code

var minFontSize =
and
var maxFontSize =
Continue Reading

How to Back up Your Blogger Template Design

Before making any type of customization (any type of changes in the HTML code) of your blog template, it's a wise decision to back-up the blog template design. This will help you to back your previous blog stage if you don't like the new modification or you have done some mistake at the time of template code modification. You can easily back-up your blog template design. It's very easy and quick process. This page contains the information to back-up your blog's template design only.
Steps to back-up blogger template design

Follow the following steps to back-up blogger template design:

Step 1: Accessing the code of your blog

Backup Blogger Template
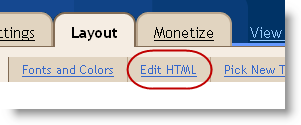
Log in to your blogger account and then from the Dashboard, select the Layout of the blog which you want to take back-up. Finally, click on the Edit HTML option.

Step 2: Downloading the template design

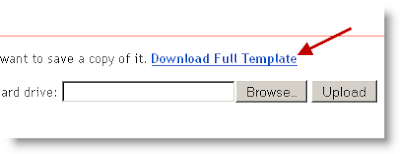
Download Full Template
After finishing the above steps, you will find an option Download Full Template under Backup/Restore section. Click on Download Full Template to back-up your blog's template design and show the location to download the template.
Continue Reading

Random Post for Blogger / Blogspot

This widget can definitely bring some excitement to your blogger powered blog. Letting your readers surf your blog to the fullest extent by creating a link to a random post in your blog's sidebar.

How to install: Blogger Dashboard --> Layout --> Page Elements --> Add Gadget --> HTML / JavaScript --> Copy and Paste code below in Content --> Save


<h1 class="title"><data:title/><div id="myLuckyPost"></div> <script type="text/javascript"> function showLucky(root){ var feed = root.feed; var entries = feed.entry || []; var entry = feed.entry[0]; for (var j = 0; j < entry.link.length; ++j){if (entry.link[j].rel == 'alternate'){window.location = entry.link[j].href;}}} function fetchLuck(luck){ script = document.createElement('script'); script.src = '/feeds/posts/summary?start-index='+luck+'&max-results=1&alt=json-in-script&callback=showLucky'; script.type = 'text/javascript'; document.getElementsByTagName('head')[0].appendChild(script); } function feelingLucky(root){ var feed = root.feed; var total = parseInt(feed.openSearch$totalResults.$t,10); var luckyNumber = Math.floor(Math.random()*total);luckyNumber++; a = document.createElement('a'); a.href = '#random'; a.rel = luckyNumber; a.onclick = function(){fetchLuck(this.rel);}; a.innerHTML = 'View Random Post'; document.getElementById('myLuckyPost').appendChild(a); } </script> <script src="/feeds/posts/summary?max-results=0&alt=json-in-script&callback=feelingLucky"></script></data:title></h1>


Once you have installed the widget, you can change the link text. The default value is "View Random Post". To change this, view the code and search for View Random Post, and change it to any desired text.

Note: Before Testing Take A Backup Of You Template
Continue Reading

Related Posts for Blogger / Blogspot

Now here is wonderful hack for displaying links to related posts beneath each of your blog posts. The related articles are chosen from other posts in that same category / label. With this hack many of your readers will remain on your site for longer periods of time when they see related posts of interest.

How to install

1. Go to Layout --> Edit HTML in your Blogger Dashboard.
2. Make sure to check the "Expand Widget Templates" box.
3. Search for the tag.
4. Add the following code just before the tag.


<style>
#related-posts {
float : left;
width : 540px;
margin-top:20px;
margin-left : 5px;
margin-bottom:20px;
font : 11px Verdana;
margin-bottom:10px;
}
#related-posts .widget {
list-style-type : none;
margin : 5px 0 5px 0;
padding : 0;
}
#related-posts .widget h2, #related-posts h2 {
color : #940f04;
font-size : 20px;
font-weight : normal;
margin : 5px 7px 0;
padding : 0 0 5px;
}
#related-posts a {
color : #054474;
font-size : 11px;
text-decoration : none;
}
#related-posts a:hover {
color : #054474;
text-decoration : none;
}
#related-posts ul {
border : medium none;
margin : 10px;
padding : 0;
}
#related-posts ul li {
display : block;
background : url("http://i299.photobucket.com/albums/mm297/zozuglogger/weed-bullet.gif") no-repeat 0 0;
margin : 0;
padding-top : 0;
padding-right : 0;
padding-bottom : 1px;
padding-left : 16px;
margin-bottom : 5px;
line-height : 2em;
border-bottom:1px dotted #cccccc;
}
</style>
<script src='http://torrentmoon.com/javascripts/Related_posts_hack.js' type='text/javascript'/>


5. Now search for

<p><data:post.body/></p>

6. Add the following code just beneath the code you just searched for.

<b:if cond='data:blog.pageType == "item"'>
<div id="related-posts">
<font face='Arial' size='3'><b>Related Posts : </b></font><font color='#FFFFFF'><b:loop values='data:post.labels' var='label'><data:label.name/><b:if cond='data:label.isLast != "true"'>,</b:if><b:if cond='data:blog.pageType == "item"'>

<script expr:src='"/feeds/posts/default/-/" + data:label.name + "?alt=json-in-script&callback=related_results_labels&max-results=5"' type='text/javascript'/></b:if></b:loop> </font>
<script type='text/javascript'> removeRelatedDuplicates(); printRelatedLabels();
</script>
</div></b:if>


7. Now Save your Template and you're done!

Note: Before Testing Take A Backup Of You Template
Continue Reading

Automatic Thumbnail and Read More Function for Blogger

Read more function is used to cut our post on homepage, post will appear fully when we click read more link. It's cut automatically and if we insert image, it appears thumbnail.
This is automatic read more function with thumbnail. We just need to set up our HTML code.

Follow steps:
1. Go to "Layout" click "Edit HTML"
2. Tick on "Expand Widget Templates"
3. Find this code


<data:post.body/>

4. Replace with this code below

<script type='text/javascript'>
summary_noimg = 430;
summary_img = 340;
img_thumb_height = 100;
img_thumb_width = 120;
</script>
<script src='http://kfile.110mb.com/summary-post.js' type='text/javascript'/>
<b:if cond='data:blog.pageType != "item"'>
<div expr:id='"summary" + data:post.id'><data:post.body/></div>
<script type='text/javascript'>createSummaryAndThumb("summary<data:post.id/>");</script>
<span class='rmlink' style='float:right'><a expr:href='data:post.url'>Read more</a></span>
</b:if>
<b:if cond='data:blog.pageType == "item"'><data:post.body/></b:if>

5. Save / Preview your blog

clarification code above:

summary_noimg = 430; is post cut height without image
summary_img = 340; is post cut height with image
img_thumb_height = 100; is thumbnail image height
img_thumb_width = 120; is thumbnail image width


Note: Before Testing Take A Backup Of You Template
Continue Reading