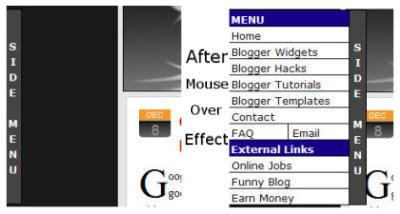
First Download these two files to your computer.
ssm.js
ssmItems.js
Now open the ssmItems.js file in notepad
After opening it in notepad you will see the codes like written below.
<!--
/*
Configure menu styles below
NOTE: To edit the link colors, go to the STYLE tags and edit the ssm2Items colors
*/
YOffset=150; // no quotes!!
XOffset=0;
staticYOffset=30; // no quotes!!
slideSpeed=20 // no quotes!!
waitTime=100; // no quotes!! this sets the time the menu stays out for after the mouse goes off it.
menuBGColor="black";
menuIsStatic="yes"; //this sets whether menu should stay static on the screen
menuWidth=150; // Must be a multiple of 10! no quotes!!
menuCols=2;
hdrFontFamily="verdana";
hdrFontSize="2";
hdrFontColor="white";
hdrBGColor="#170088";
hdrAlign="left";
hdrVAlign="center";
hdrHeight="15";
linkFontFamily="Verdana";
linkFontSize="2";
linkBGColor="white";
linkOverBGColor="#FFFF99";
linkTarget="_top";
linkAlign="Left";
barBGColor="#444444";
barFontFamily="Verdana";
barFontSize="2";
barFontColor="white";
barVAlign="center";
barWidth=20; // no quotes!!
barText="SIDE MENU"; // <IMG> tag supported. Put exact html for an image to show.
///////////////////////////
// ssmItems[...]=[name, link, target, colspan, endrow?] - leave 'link' and 'target' blank to make a header
ssmItems[0]=["MENU"] //create header
ssmItems[1]=["Home", "http://smartbloggertemplate.blogspot.com", ""]
ssmItems[2]=["Tips and Tricks", "http://smartbloggertemplate.blogspot.com/search/label/Tips%20and%20Tricks",""]
ssmItems[3]=["Blogger Hacks", "http:///smartbloggertemplate.blogspot.com/search/label/Blogger%20Hack", ""]
ssmItems[4]=["Blogger Tutorials", "http://smartbloggertemplate.blogspot.com/search/label/Blogger%20Tutorial", "_new"]
ssmItems[5]=["Blogger Templates", "http://smartbloggertemplate.blogspot.com/search/label/Blogger%20Templates", ""]
ssmItems[6]=["Contact", "http://smartbloggertemplate.blogspot.com/2008/11/contact-us.html", ""]
ssmItems[7]=["FAQ", "#nogo", "", 1, "no"] //create two column row
ssmItems[8]=["Email", "#nogo", "",1]
ssmItems[9]=["External Links", "", ""] //create header
ssmItems[10]=["South Indian Models", "http://tollywoodceleb.blogspot.com", ""]
ssmItems[11]=["Software Download", "http://downloadsofwarez.blogspot.com", ""]
ssmItems[12]=["Free Softwares", "", ""]
buildMenu();
//-->
Now just edit the the links in red in codes to place your own link which you want to display and text in blue which you want to show up the title for that link.
After editing all these links just save the file.
Now upload both files ssm.js and ssmItems.js to your own server like on geocities or sigmirror dot com,don't use mine as will not work due to exceeded bandwidth.
Now GO To LAYOUT > EDIT HTML
and find the </head> tag and place the below codes before it.
<style type="text/css">
<!--
A.ssmItems:link {color:black;text-decoration:none;}
A.ssmItems:hover {color:black;text-decoration:none;}
A.ssmItems:active {color:black;text-decoration:none;}
A.ssmItems:visited {color:black;text-decoration:none;}
//-->
</style>
<SCRIPT SRC="http://www.sigmirror.com/files/23824_orh0p/ssm.js" language="JavaScript1.2">
//Dynamic-FX slide in menu v6.5 (By maXimus, http://maximus.ravecore.com/)
//Updated July 8th, 03' for doctype bug
//For full source, and 100's more DHTML scripts, visit http://www.dynamicdrive.com
</SCRIPT>
<SCRIPT SRC="http://www.sigmirror.com/files/23826_tfol5/ssmItems.js" language="JavaScript1.2"></SCRIPT>
And don't forget to change the links in red above with the links of yours where your ssm.js and ssmItems.js file are uploaded to your own server.
And now SAVE It.
Yup you have just Done now. View your blog. If you have any problem please write below in comments i will help you out.I think you will enjoy this widget for sure.

0 comments:
Post a Comment